Total Cooking Time: 40–45 minutes
Difficulty Level: Easy
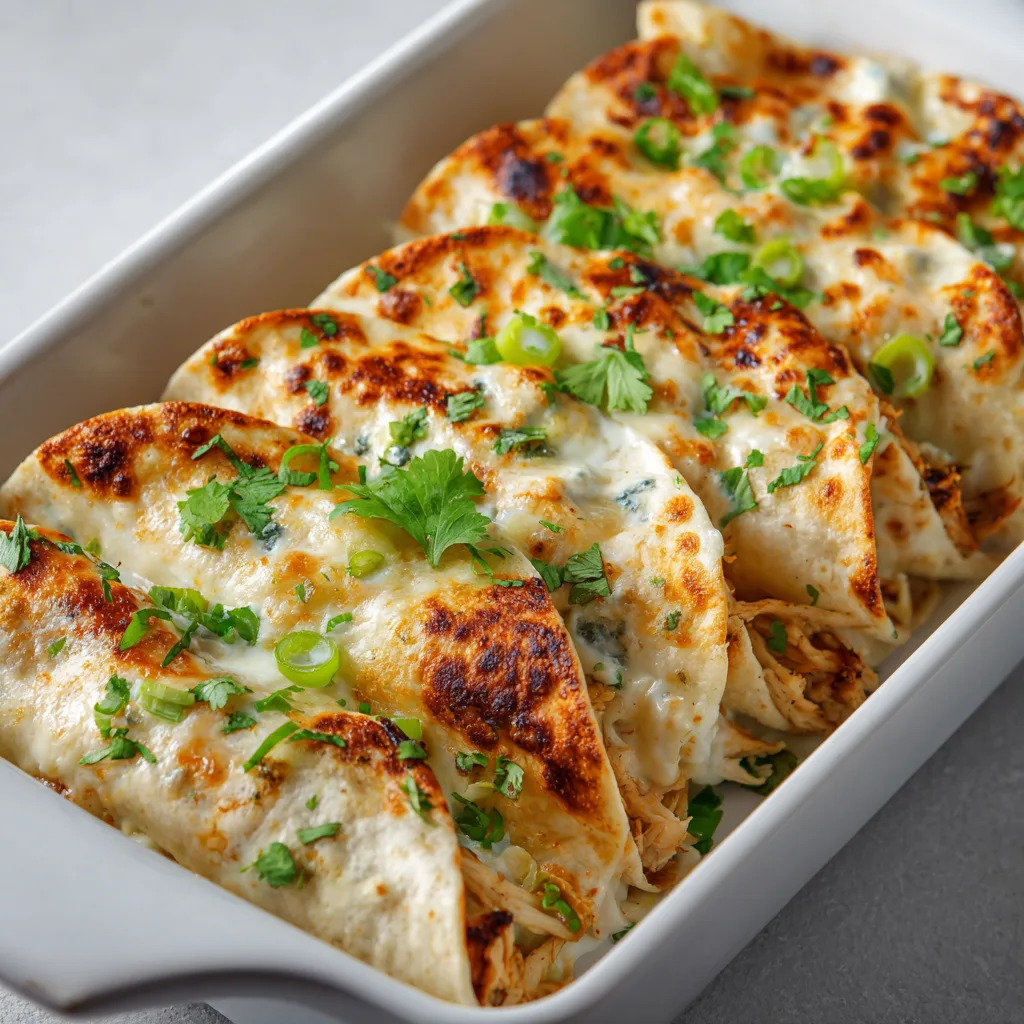
There’s something undeniably fun about tacos—especially when they’re baked, cheesy, and packed with creamy, savory goodness. These Baked Cream Cheese Chicken Tacos take everything you love about taco night and elevate it into a warm, melty, oven-finished dish that’s perfect for family dinners or casual gatherings. As they bake, the tortillas crisp up beautifully while the filling turns rich, creamy, and irresistibly flavorful.
The combination of tender shredded chicken, smooth cream cheese, and bold taco spices creates a filling that’s both comforting and exciting. Each bite delivers a balance of textures—the slight crunch of the baked tortilla, the creamy interior, and the gooey melted cheese on top. It’s the kind of meal that feels indulgent yet is incredibly easy to put together.
This recipe is especially great for busy evenings or when you want something interactive and fun without spending hours in the kitchen. Kids love it, adults crave it, and it’s easy to customize with your favorite toppings. Estimated at around 450–550 calories per serving, it’s a satisfying meal that doesn’t require complicated prep or cleanup.
Key Ingredients
Each ingredient plays a role in building that creamy, cheesy, taco-inspired flavor:
- Cooked shredded chicken (2 cups) – The main protein; tender and perfect for soaking up the creamy, seasoned mixture.
- Cream cheese (8 oz, softened) – Adds rich, smooth texture and a slightly tangy flavor that makes the filling irresistible.
- Shredded cheddar cheese (1 cup) – Melts beautifully and adds sharp, cheesy depth.
- Shredded mozzarella (1 cup) – Brings stretchiness and a mild creaminess to balance the cheddar.
- Taco seasoning (2 tablespoons) – Infuses the filling with bold, smoky, and slightly spicy flavor.
- Garlic powder (1 teaspoon) – Enhances the savory profile of the dish.
- Onion powder (1 teaspoon) – Adds subtle sweetness and depth.
- Salsa (½ cup) – Provides moisture, acidity, and a fresh tomato-based flavor.
- Sour cream (¼ cup) – Lightens the filling and adds extra creaminess.
- Small flour tortillas (8–10 pieces) – Hold the filling and crisp up nicely in the oven.
- Olive oil (2 tablespoons) – Helps the tortillas turn golden and slightly crispy.
- Salt (to taste) – Balances all the flavors.
- Black pepper (½ teaspoon) – Adds mild heat and complexity.
- Fresh cilantro (optional, chopped) – Brightens the dish with a fresh, herbal finish.
- Green onions (optional, sliced) – Add a mild crunch and freshness.
Baked Cream Cheese Chicken Tacos – Easy Fun Dinner
- Total Time: 40–45 minutes
- Yield: 4 servings 1x
Description
Baked Cream Cheese Chicken Tacos are creamy, cheesy, and packed with flavor. These oven-baked tacos deliver crispy tortillas with a rich chicken filling, perfect for easy family dinners.
Ingredients
- 2 cups cooked shredded chicken
- 8 oz cream cheese, softened
- 1 cup shredded cheddar cheese
- 1 cup shredded mozzarella cheese
- 2 tablespoons taco seasoning
- 1 teaspoon garlic powder
- 1 teaspoon onion powder
- 1/2 cup salsa
- 1/4 cup sour cream
- 8–10 small flour tortillas
- 2 tablespoons olive oil
- Salt to taste
- 1/2 teaspoon black pepper
- Fresh cilantro (optional)
- Green onions (optional)
Instructions
1. Preheat oven to 375°F (190°C) and grease a baking dish
2. Mix cream cheese, sour cream, taco seasoning, garlic powder, onion powder, salt, and pepper until smooth
3. Add shredded chicken and salsa, then mix well
4. Stir in half of the cheddar and mozzarella cheese
5. Warm tortillas slightly to make them flexible
6. Fill each tortilla with chicken mixture, roll tightly, and place seam-side down
7. Brush tortillas with olive oil
8. Sprinkle remaining cheese on top
9. Bake for 20–25 minutes until golden and bubbly
10. Optional: broil for 2–3 minutes for extra crispiness
11. Let rest for 5 minutes, then garnish with cilantro and green onions
Notes
- Use rotisserie chicken for convenience
- Do not overfill tortillas to prevent breaking
- Add jalapeños for extra spice
- Best reheated in oven or air fryer for crispiness
- Great for meal prep and freezing
- Prep Time: 15 minutes
- Cook Time: 25 minutes
- Category: Dinner
- Method: Baking
- Cuisine: Mexican-American
Nutrition
- Serving Size: 1 serving
- Calories: 500
- Sugar: 3g
- Sodium: 650mg
- Fat: 27g
- Saturated Fat: 12g
- Unsaturated Fat: 13g
- Trans Fat: 0g
- Carbohydrates: 35g
- Fiber: 3g
- Protein: 32g
- Cholesterol: 105mg
How to Make It (Step-by-Step Method)
Preheat your oven to 375°F (190°C). Lightly grease a baking dish or line a sheet pan with parchment paper to prevent sticking and make cleanup easier.
In a large mixing bowl, combine the softened cream cheese, sour cream, taco seasoning, garlic powder, onion powder, salt, and black pepper. Mix until smooth and well blended. This forms the creamy base that will coat the chicken evenly.
Add the shredded chicken and salsa into the mixture. Stir until everything is fully combined and the chicken is evenly coated with the creamy, seasoned mixture. Fold in half of the shredded cheddar and mozzarella cheese, reserving the rest for topping.
Warm the tortillas slightly (in the microwave for about 20–30 seconds) to make them more flexible and easier to roll. Spoon a generous amount of the chicken mixture into each tortilla, then roll them up tightly and place them seam-side down in the prepared baking dish.
Brush the tops of the tortillas lightly with olive oil. This step is key to achieving that golden, slightly crispy texture once baked. Sprinkle the remaining cheese evenly over the top of the tacos.
Bake in the preheated oven for 20–25 minutes, or until the cheese is melted and bubbly and the edges of the tortillas are lightly golden and crisp. If you want extra browning, you can switch to broil for the last 2–3 minutes—just keep a close eye to prevent burning.
Remove from the oven and let the tacos rest for about 5 minutes. This helps the filling set slightly and makes them easier to serve. Garnish with chopped cilantro and green onions before serving.

Serving Suggestions
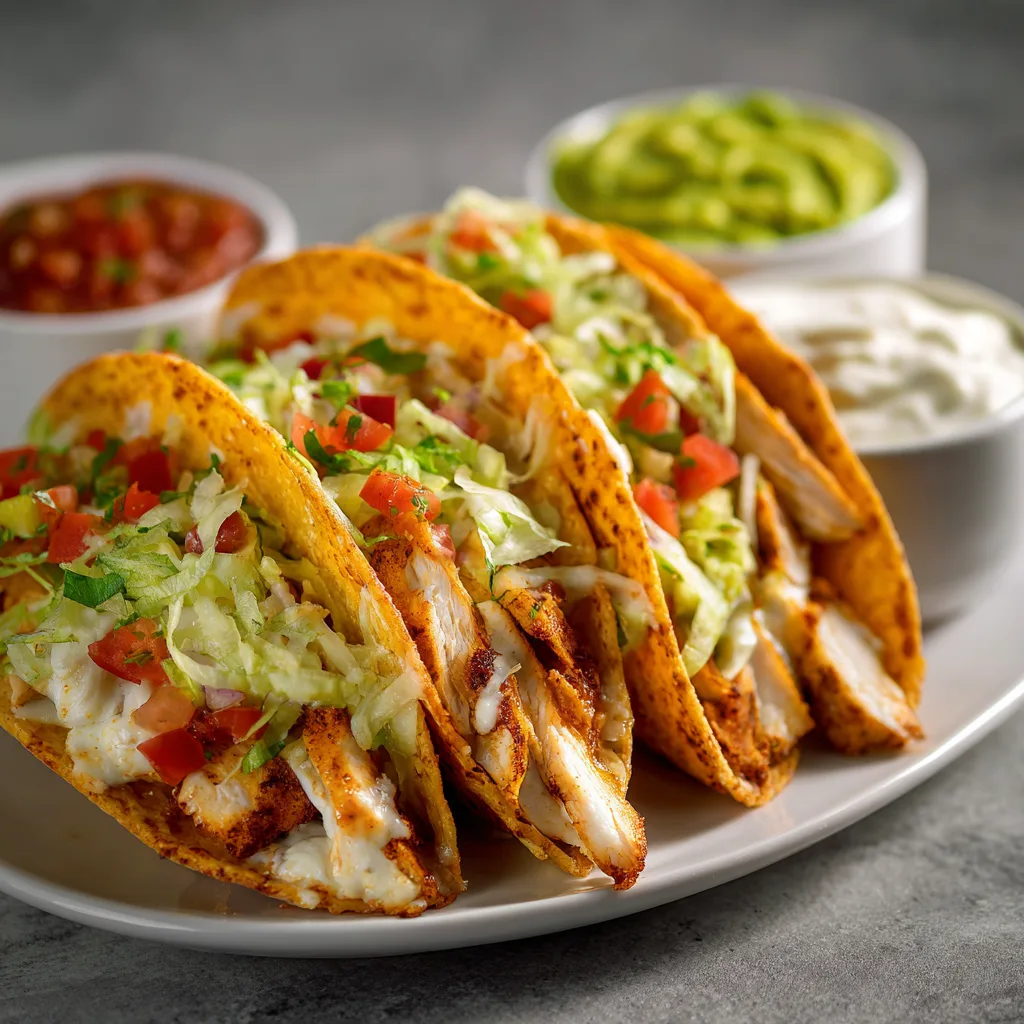
Serving these Baked Cream Cheese Chicken Tacos can be just as fun as making them. For a casual family-style dinner, arrange the tacos on a large platter straight from the oven, letting everyone grab their own. Add small bowls of toppings like guacamole, salsa, sour cream, shredded lettuce, and diced tomatoes so each person can customize their tacos. This setup creates a lively, interactive meal that’s perfect for weeknights or relaxed gatherings.
If you’re aiming for a more balanced plate, pair the tacos with sides that complement their richness. A light, zesty salad with lime vinaigrette works beautifully to cut through the creaminess. Mexican-style rice, black beans, or grilled corn can also round out the meal while adding texture and variety. The contrast between the creamy tacos and fresh or slightly smoky sides makes every bite more interesting.
For parties or game nights, you can serve these tacos as part of a larger spread. Cut them in half and arrange them as bite-sized portions alongside dips and finger foods. They hold their shape well and are easy to eat without utensils, making them perfect for sharing.
You can also turn this into a build-your-own taco bar by offering extra fillings like jalapeños, hot sauce, or different cheeses. Whether you keep it simple or go all out, these tacos adapt effortlessly to any occasion, making them a go-to option for fun, flavorful meals.
Storage + Meal Prep
These tacos are excellent for leftovers and meal prep, making them a practical choice for busy schedules. Once cooled, store them in an airtight container in the refrigerator for up to 3 days. To keep them from becoming soggy, place a paper towel in the container to absorb excess moisture.
For longer storage, you can freeze the tacos before or after baking. If freezing before baking, assemble the tacos and place them in a freezer-safe dish. Cover tightly and freeze for up to 2 months. When ready to cook, bake directly from frozen at 375°F (190°C), adding an extra 10–15 minutes to the cooking time.
If freezing after baking, let the tacos cool completely before transferring them to a freezer-safe container. Reheat in the oven for best results, as this helps restore their crispiness. Avoid microwaving if possible, as it can make the tortillas soft.
Reheating in the oven at 350°F (175°C) for about 10–15 minutes works best for maintaining texture. You can also use an air fryer for a quicker option that brings back the crisp edges.
For meal prep, prepare the chicken filling ahead of time and store it separately in the refrigerator. When ready to eat, simply assemble and bake fresh tacos. Add garnishes like cilantro, green onions, or fresh toppings just before serving to keep everything vibrant and flavorful.
Conclusion
Baked Cream Cheese Chicken Tacos are the perfect example of how simple ingredients can come together to create something incredibly satisfying. They’re creamy, cheesy, slightly crispy, and packed with flavor—everything you want in a fun, comforting dinner. With minimal effort and maximum payoff, this recipe is sure to become a regular in your meal rotation.
What makes these tacos truly special is their versatility. You can customize the filling, adjust the spice level, or experiment with different toppings to suit your taste. They’re just as perfect for a quick weeknight dinner as they are for entertaining friends or feeding a hungry family.
Give them a try, make them your own, and enjoy the process of creating a meal that’s as fun to eat as it is to prepare. Once you do, these baked tacos will quickly earn a permanent spot in your kitchen favorites.